|
| Installation Instructions |
- Win9x
- WinNT 4
- Upgrading
- Starting up WinDVD for the First time
- Setting up your regional information
- Setting up parental controls
| Installation |
| The installation will not install DirectX 6.1 and DirectMedia in Windows NT, which can not use either API. Windows 2000 already contains DirectX 6.1 and DirectMedia so installation is bypassed for that OS as well. |
| Fresh Installation of WinDVD (Windows 95/98 Users) |
- Start Windows in Normal mode.
- Insert your WinDVD installation disk; the install program should start automatically. (If installation does not start then browse to your CD ROM and click on the SETUP icon.)
- Click Next at the welcome screen, Click on YES when prompted.
- Type in your serial number when prompted, and click Next.
- Select "Typical" install and click next. Setup will now copy files to your disk. When setup is done click on "Finish".
- Select "Yes, I want to restart my computer now" when prompted, and click on "Finish" again.
- If you are asked to install DirectX 6.1 installed then click "Yes" when prompted
- If you are asked to install DirectMedia then click "Yes" when prompted.

The WinDVD install checks to verify that you have current versions of DirectX and DirectMedia. If the install finds the same or newer version of either application then you will not be asked to install either DirectX or DirectMedia. - After system reboots insert your DVD and enjoy.
| WinDVD uses DVD-ROM Drive DMA transfers to improve DVD performance. Please verify that you have DMA transfers turned on before using WinDVD. Click here for more information |
| Fresh Installation of WinDVD (Windows NT4 Users) |
- Start Windows in Normal mode.
- Insert your WinDVD installation disk; the install program should start automatically. (If installation does not start then browse to your CD ROM and click on the SETUP icon.)
- Click Next at the welcome screen, Click on YES when prompted.
- Type in your serial number when prompted, and click Next.
- Select "Typical" install and click next. Setup will now copy files to your disk. When setup is done click on "Finish".
- WinDVD uses DVD-ROM Drive DMA transfers to improve DVD performance. A replacement Intel Piixide driver is included on the WinDVD disc to enable DMA transfers in Windows NT4. (This file replaces Atapi.sys).
- IF YOU HAVE INTEL CORE LOGIC, please follow the on-screen instructions to install the new driver and re-boot to complete the process.
 If you do not have Intel Core Logic, please try your motherboard manufacturer�s website to
find a new NT4 IDE driver to enable DMA transfers. Otherwise, DVD performance will suffer dramatically.
If you do not have Intel Core Logic, please try your motherboard manufacturer�s website to
find a new NT4 IDE driver to enable DMA transfers. Otherwise, DVD performance will suffer dramatically.
- After system reboots insert your DVD and enjoy.
| Patch Upgrade Existing WinDVD Player |
- Start Windows in Normal mode.
- Go to the directory where you downloaded the patch.
- Unzip the file and run the executable, Click Next at the welcome screen, Click on YES when prompted to install WinDVD Player.
- Type in your serial number when prompted, and click Next.
- Select "Typical" install and click next. Setup will now copy files to your disk. When setup is done click on "Finish".
- Select "Yes, I want to restart my computer now" when prompted, and click on "Finish" again.
- After system reboots insert your DVD and enjoy.
| Starting up for the first time |
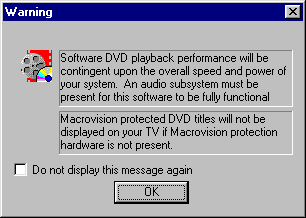
| Performance Warning |
When you startup WinDVD for the first time you are given a warning dialog that explains that performance is dependant on your overall system configuration. There are many factors that determine how smooth your playback will be. For more information read the
requirements section of the release note.
|
 |
If you do not have a TV out connector on your graphic board then Macrovision does not apply to you; however, if you do have a TV out and your DVD does not play your title, then you will need to turn off the TV out feature in your graphic card's software.
| Setting up Your Regional information |
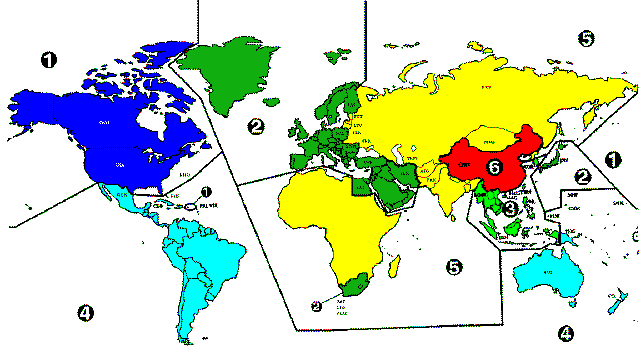 The DVD standard specifies six regions, also called locales. Regional coding limits what countries a disc can be used in. A disc coded for North America (region 1) will not play back on a player sold in Japan (region 2). Right now the world is divided into six regions.
- USA, Canada
- West Europe, Japan, South Africa
- South East Asia
- Australia, Spanish America
- Russia, East Europe, Africa
- China
| How to determine a which region you should choose: |
 Example of Region 1 Icon |
To determine which region your DVDs are designed for look for a small standardized globe icon with the region number superimposed on it. If a disc plays in more than one region it will have more than one number on the globe. If a disc is non-regionalized, therefore, does not have any regional coding, the disc should have a globe with "ALL" instead of a number; however, many non-regionalized DVDs simply do not have the globe icon. |
| The first time that you start WinDVD with a regionalized DVD in the drive your region will automatically be selected. If you later try to play a disc from a different region you will get the dialog box shown to the right letting you know that you need to change the region setting. | 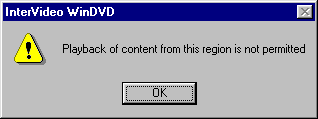 |
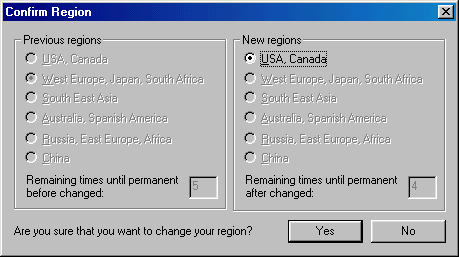
| Click on OK and you will be brought to the Region change page below. | |
 |
|
|
On the left side we show you what your current setting is and on the right will display what Region the DVD currently in the drive is. The regions are listed by description in order from 1 to 6 (i.e. USA, Canada = Region 1, West Europe, Japan, South Africa = 2, etc.) We do not force you to change the region. If you do not wish to use one of your 5 chances to change regions then click on NO. If you do wish to change regions then just click on YES and the DVD from the new region will begin to play. |
|
| Limited number of changes allowed |

| If your DVD drive is a Phase 2, also known as RPC2, drive then the regional setting's countdown will be obtained from the drive not created fresh from our software. Therefore, if your drive has been used to change regions twice before then you will only be given 3 chances to change regions (5 total chances - 2 chances taken.) Re-installing the software will NOT reset the region selection options. |
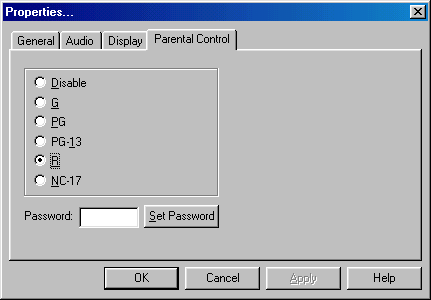
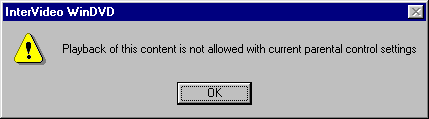
| Setting up parental controls |
| DVD players allow parents to prevent playback of objectionable content. By default the WinDVD is allowed to playback any title. You can easily change this by clicking on the properties button. Selecting the Parental Control tab, and then choosing the desired parental restriction. You may also want to setup a password to prevent your kids from changing the parental control on their own. Use the set password button to do this: At this time all movies that have a higher rating will not allow the movie to playback. |
|
| Extra Information: |
| North American DVDs are coded by the manufacturer with a rating system that roughly corresponds to the U.S. movie ratings system. In other regions of the world, similar systems, native to that area, are used. |