Back to Contents Page
Memory
Dell™ Dimension™ 2400 Series
 Installing Memory
Removing Memory
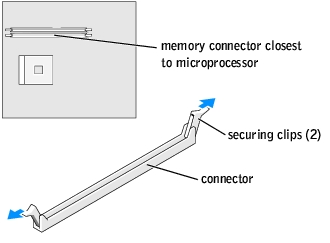
You can increase your computer memory by installing memory modules on the system board. For information on the type of memory supported by your computer, see "Memory."
Installing Memory

|
CAUTION: Before you begin any of the procedures in this section, follow the safety instructions in your Owner's Manual or Product Information Guide. |
- Shut down the computer through the Start menu.
- Ensure that your computer and attached devices are turned off. If your computer and
attached devices did not automatically turn off when you shut down your computer,
turn them off now.
 |
NOTICE: To disconnect a network cable, first unplug the cable from your computer and then
unplug it from the network wall jack.
|
- Disconnect any telephone or telecommunication lines from the computer.
- Disconnect your computer and all attached devices from their electrical outlets, and
then press the power button to ground the system board.
|
|
CAUTION: To guard against electrical shock, always unplug your computer from the electrical outlet before opening the cover. |
- Remove the computer cover.
- Press out the securing clip at each end of the memory module connector.
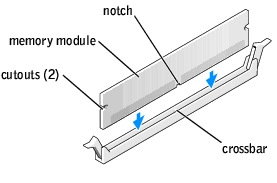
- Align the notch on the bottom of the module with the crossbar in the connector.
|
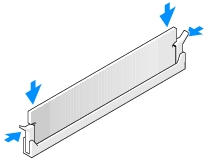
NOTICE: To avoid damage to the memory module, press the module straight down into the
connector while you apply equal force to each end of the module.
|
- Insert the module into the connector until the module snaps into position.
If you insert the module correctly, the securing clips snap into the cutouts at each end of the module.
- Replace the computer cover.
|
NOTICE: To connect a network cable, first plug the cable into the network wall jack and then
plug it into the computer.
|
- Connect your computer and devices to electrical outlets, and turn them on.
- Right-click the My Computer icon and click Properties.
- Click the General tab.
- To verify that the memory is installed correctly, check the amount of memory (RAM)
listed.
Removing Memory
|
|
CAUTION: Before you begin any of the procedures in this section, follow the safety instructions in your Owner's Manual or Product Information Guide. |
 |
NOTE: Memory purchased from Dell is covered under your computer warranty.
|
- Shut down the computer through the Start menu.
- Ensure that your computer and attached devices are turned off. If your computer and
attached devices did not automatically turn off when you shut down your computer,
turn them off now.
|
NOTICE: To disconnect a network cable, first unplug the cable from your computer and then
unplug it from the network wall jack.
|
- Disconnect any telephone or telecommunication lines from the computer.
- Disconnect your computer and all attached devices from their electrical outlets, and
then press the power button to ground the system board.
|
|
CAUTION: To guard against electrical shock, always unplug your computer from the electrical outlet before opening the cover. |
- Remove the computer cover.
- Press out the securing clip at each end of the memory module connector.
- Grasp the module and pull up.
If the module is difficult to remove, gently ease the module back and forth to remove it from the connector.
Back to Contents Page