Back to Contents Page
Microprocessor
Dell™ Dimension™ 2400 Series
 Removing the Microprocessor
Installing the Microprocessor
Removing the Microprocessor

|
CAUTION: Before you begin any of the procedures in this section, follow the safety instructions in your Owner's Manual or Product Information Guide. |
- Shut down the computer through the Start menu.
- Ensure that your computer and attached devices are turned off. If your computer and
attached devices did not automatically turn off when you shut down your computer,
turn them off now.
 |
NOTICE: To disconnect a network cable, first unplug the cable from your computer and then
unplug it from the network wall jack.
|
- Disconnect any telephone or telecommunication lines from the computer.
- Disconnect your computer and all attached devices from their electrical outlets, and
then press the power button to ground the system board.
|
|
CAUTION: To guard against electrical shock, always unplug your computer from the electrical outlet before you open the cover. |
- Remove the computer cover.
|
NOTICE: Before touching anything inside your computer, ground yourself by touching an
unpainted metal surface, such as the metal at the back of the computer. While you work,
periodically touch an unpainted metal surface to dissipate any static electricity that could harm
internal components.
|
- Disconnect the cooling fan power cable from the fan connector (J30) on the system
board.
- Disconnect the power cable from the microprocessor power connector (J21) on the
system board.
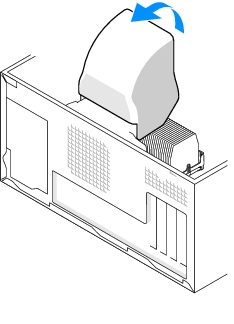
- Lift the air shroud to disengage the anchors and then rotate the shroud up.
|
|
CAUTION: The heat sink can get very hot during normal operation. Be sure that the heat sink has had sufficient time to cool before you touch it. |
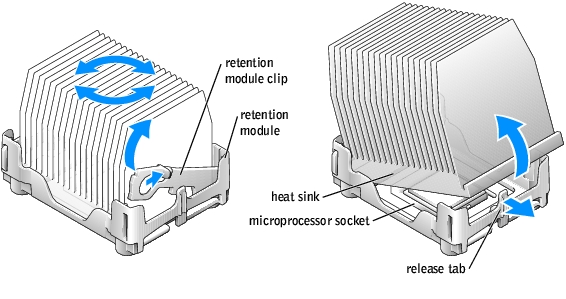
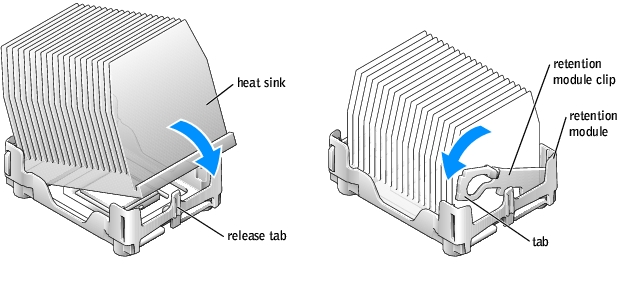
- Remove the microprocessor heat sink:
- Twist the heat sink from side to side to break the seal.
- Remove the retention module clip by pressing in on the tab and lifting the
retention module clip up.
- Pull the release tab out until the heat sink is released.
- Lift the heat sink away from the microprocessor.
|
NOTICE: Lay the heat sink down with the thermal grease facing upward.
|
|
NOTICE: If you are installing a microprocessor upgrade kit from Dell, discard the original heat
sink. If you are not installing a microprocessor upgrade kit from Dell, reuse the original heat
sink when you install your new microprocessor.
|
|
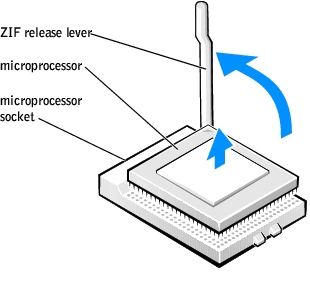
NOTICE: Be careful not to bend any of the pins when you remove the microprocessor from the
socket. Bending the pins can permanently damage the microprocessor.
|
- Remove the microprocessor from the socket.
Leave the release lever extended in the release position so that the socket is ready for the new microprocessor.
Installing the Microprocessor
|
NOTICE: Ground yourself by touching an unpainted metal surface on the back of the computer.
|
|
NOTICE: Be careful not to bend any of the pins when you unpack the microprocessor. Bending
the pins can permanently damage the microprocessor. If any of the pins on the microprocessor
appears to be bent, see "Contacting Dell" in the Owner's Manual for instructions on obtaining
technical assistance.
|
- Unpack the new microprocessor.
|
NOTICE: You must position the microprocessor correctly in the socket to avoid permanent
damage to the microprocessor and the computer when you turn on the computer.
|
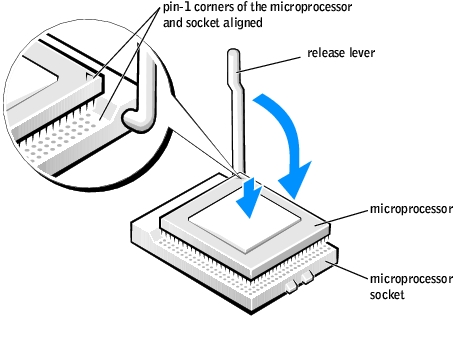
- If the release lever on the socket is not fully extended, move it to that position.
- Align the pin-1 corners of the microprocessor and socket.
|
NOTICE: When you place the microprocessor in the socket, ensure that all of the pins fit into
the corresponding holes on the socket.
|
- Set the microprocessor lightly in the socket and ensure that all pins are headed into
the correct holes. Do not use force, which could bend the pins if the microprocessor is
misaligned. When the microprocessor is positioned correctly, press it with minimal
pressure to seat it.
- When the microprocessor is fully seated in the socket, pivot the release lever back
toward the socket until it snaps into place to secure the microprocessor.
|
NOTICE: If you are not installing a microprocessor upgrade kit from Dell, reuse the original
heat sink assembly when you replace the microprocessor.
|
If you installed a microprocessor replacement kit from Dell, return the original heat sink assembly and microprocessor to Dell in the same package in which your replacement kit was sent.
- Install the heat sink:
- Insert the notched end of the heat sink onto the end of the retention module
which is next to the power supply.
- Lower the heat sink until it fits securely in the module.
- When the heat sink is secured, pivot the retention module clip down until the tab
snaps into place to secure the heat sink.
- Lower the airflow shroud over the heat sink.
- Reconnect the cooling fan power cable to the fan connector (J30) on the system board.
- Reconnect the power cable to the microprocessor power connector (J21) on the system
board.
- Replace the computer cover.
|
NOTICE: To connect a network cable, first plug the cable into the network wall jack and then
plug it into the computer.
|
- Connect your computer and devices to electrical outlets, and turn them on.
Back to Contents Page