Back to Contents Page
System Setup Program
Dell Dimension 2400 Series
 Overview
Entering the System Setup Program
Clearing Forgotten Passwords
Overview
The system setup program contains the standard settings for your computer.
 |
NOTICE: Unless you are an expert computer user, do not change the settings for this program.
Certain changes might make your computer work incorrectly.
|
You can use the system setup program as follows:
- To change the system configuration information after you add, change, or remove any hardware in your computer
- To set or change user-selectable options—for example, the user password
Dell recommends that you write down the system setup program screen information for future reference.
Entering the System Setup Program
- Turn on (or restart) your computer.
- When F2 = Setup, F12 = Boot Menu appears in the upper-right corner of the screen, press <F12>.
If you wait too long and the operating system logo appears, continue to wait until you see the Microsoft® Windows® desktop. Then shut down your computer and try again.
See the following figure for an example of the main program screen.
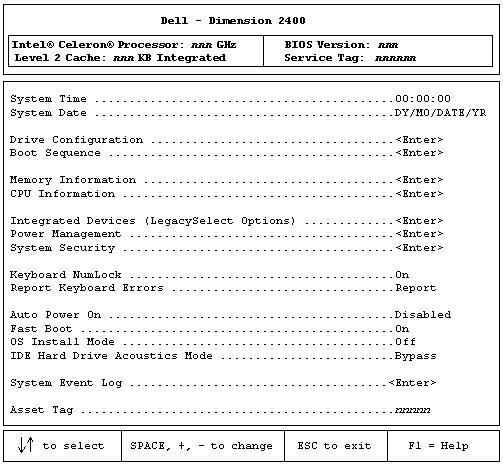
System Setup Screens
The system setup program screens display the current configuration information for your computer. Information on the screen is divided into five areas:
- Title — The box at the top of all screens that lists the computer name.
- Computer data — Two boxes below the title box that display your computer processor, L2 cache, service tag, and the version number of the BIOS.
- Options — A scrollable box listing options that define the configuration of your computer, including installed hardware, power conservation, and security features.
Fields to the right of the option titles contain settings or values. When <Enter> appears to the right of an option title, press <Enter> to access a popup menu of additional options.
- Key functions — A line of boxes across the bottom of all screens that lists keys and their functions within system setup.
- Help — Press <F1> for information on the option that is selected (highlighted).
|
Option
|
Function
|
|---|
System Time | Displays the system time. |
System Date | Displays the system date. |
Drive Configuration | Displays drive configurations when <Enter> is pressed. |
Boot Sequence | Displays boot sequence when <Enter> is pressed. |
Memory Information | Displays amount of system memory when <Enter> is pressed. |
CPU Information | Displays CPU information when <Enter> is pressed. |
Integrated Devices (Legacy Select Options) | Displays integrated device options when <Enter> is pressed. |
Power Management | Displays power management options when <Enter> is pressed. |
System Security | Displays system security options when <Enter> is pressed. |
Keyboard Numlock | Turns the Keyboard NumLock option on and off.
The default is On. |
Report Keyboard Errors | Displays keyboard errors when set to Report. The default is Report. |
Auto Power On | Allows auto power-on. The default is Disabled. |
Fast Boot | Turns the fast boot option on and off. The default is On. |
OS Install Mode | Turns the OS Install Mode on and off. The default is Off. |
IDE Hard Drive Acoustics Mode | Sets the performance speed of your hard drive. The default is Bypass. |
System Event Log | Displays the system event log when <Enter> is pressed. |
Asset Tag | Displays asset tag information. |
The following table shows Drive Configuration option information.
Diskette Drive A: | Displays floppy drive details. |
Primary Drive 0: | Displays primary hard drive 0. The default is Auto. |
Primary Drive 1: | Displays primary hard drive 1 (if installed). The default is Off. |
Secondary Drive 0: | Displays secondary hard drive 0.The default is Auto. |
Secondary Drive 1: | Displays secondary hard drive device type. The default is Off. |
IDE Drive UDMA: | Turns IDE Drive UDMA on and off.
The default is On. |
The following table shows Memory Information option information.
|
Option
|
Function
|
|---|
Installed System Memory | Displays the amount of installed system memory. |
System Memory Speed | Displays the speed of your system memory. |
System Memory Channel Mode | Displays the mode of your system memory. |
AGP Aperture | Displays the amount of aperture memory. The default is 128 MB. |
The following table shows CPU Information option information.
|
Option
|
Function
|
|---|
Hyper-Threading | Enables Hyper-Threading. The default is Disabled. |
CPU Speed | Sets the CPU speed. The default is Normal. |
Bus Speed | Displays the bus speed. |
Processor 0 ID | Displays processor ID. |
Clock Speed | Displays clock speed. |
Cache Size | Displays cache size. |
The following table shows Integrated Devices (Legacy Select Options) option information.
|
Option
|
Function
|
|---|
Sound | Turns the integrated sound off and on. The default is On. |
Network Interface Controller | Turns the network interface controller off and on. The default is On. |
Mouse Port | Turns the mouse port off and on. The default is On. |
USB Emulation | Turns USB emulation off and on. The default is On. |
USB Controller | Turns the USB controller off and on. The default is On. |
Serial Port 1 | Sets serial port options and turns the port off and on. The default is Auto. |
Parallel Port | Displays parallel port settings when <Enter> is pressed. The default mode is PS/2 and the I/O address default is 378h. |
Diskette Interface | Sets the floppy drive interface options. The default is Auto. |
Primary Video Controller | Sets the primary video controller. The default is AGP. |
The following table shows Power Management option information.
|
Option
|
Function
|
|---|
Suspend Mode | Displays the suspend state used by the computer. The default is S3. |
AC Power Recovery | Enables AC power recovery to occur. The default is Off. |
Low Power Mode | Minimizes power use when the computer is off. The default is
Disabled. |
The following table shows System Security option information.
|
Option
|
Function
|
|---|
Password Status | Locks and unlocks the password option. The default is Unlocked. |
System Password | Enables and disables the system password. The default is Not enabled. |
Setup Password | Enables and disables the setup password. The default is Not enabled. |
POST Hotkeys | Selects key that are active during POST. The default is F2 and F12. |
PXE BIS Default Policy | Specifies how the computer will respond to boot integrity services authentication requests when no certificate has been installed. When set to Deny (the default), the request is rejected. The request is accepted when set to Accept. |
Boot Sequence
This feature allows you to change the boot sequence for devices.
Changing Boot Sequence for the Current Boot
You can use this feature, for example, to restart your computer to a USB device such as a floppy drive, memory key, or CD-RW drive.
- Turn on (or restart) your computer.
- When F2 = Setup, F12 = Boot Menu appears in the upper-right corner of the screen, press <F12>.
If you wait too long and the operating system logo appears, continue to wait until you see the Microsoft Windows desktop. Then shut down your computer and try again.
The Boot Device Menu appears, listing all available boot devices. Each device has a number next to it.
- At the bottom of the menu, enter the number of the device that is to be used for the current boot only.
Changing Boot Sequence for Future Boots
- Enter the system setup program.
- Use the arrow keys to highlight the Boot Sequence menu option and press <Enter> to access the pop-up menu.

|
NOTE: Write down your current boot sequence in case you want to restore it.
|
- Press the up- and down-arrow keys to move through the list of devices.
- Press the spacebar to enable or disable a device (enabled devices have a checkmark).
Press plus (+) or minus () to move a selected device up or down the list.
Clearing Forgotten Passwords

|
CAUTION: Before you begin any of the procedures in this section, follow the safety instructions in your Owner's Manual or Product Information Guide. |
|
|
CAUTION: To guard against electrical shock, always unplug your computer from the electrical outlet before opening the cover. |
- Shut down the computer through the Start menu.
|
NOTICE: To disconnect a network cable, first unplug the cable from your computer and then
unplug it from the network wall jack.
|
- Turn off any attached devices and disconnect them from their electrical outlets.
- Disconnect the computer power cable from the wall outlet, and then press the power
button to ground the system board.
- Remove the computer cover.
- Locate the 2-pin password jumper on the system board, and then attach the jumper to
both pins.
The jumper is attached to only one pin for shipping.
- Replace the computer cover.
|
NOTICE: To connect a network cable, first plug the cable into the network wall jack and then
plug it into the computer.
|
- Connect your computer and devices to electrical outlets, and then turn them on.
- If you are prompted to press <F1> to continue, press <F1>.
- After the Microsoft Windows desktop appears on your computer, shut down the
computer.
|
NOTICE: To disconnect a network cable, first unplug the cable from your computer and then
unplug it from the network wall jack.
|
- Turn off any attached devices and disconnect them from their electrical outlets.
- Disconnect the computer power cable from the wall outlet, and then press the power
button to ground the system board.
- Remove the computer cover.
- Remove the password jumper.
Attach the jumper to only one pin so that you do not lose it.
- Replace the computer cover.
|
NOTICE: To connect a network cable, first plug the cable into the network wall jack and then
plug it into the computer.
|
- Connect your computer and devices to electrical outlets, and turn them on.
- If you are prompted to press <F1> to continue, press <F1>.
Back to Contents Page