Back to Contents Page
Drives
Dell™ Dimension™ 2400 Series
 Adding a Floppy Drive
Adding or Replacing a CD or DVD Drive
Replacing a Hard Drive
Adding a Floppy Drive

|
CAUTION: Before you begin any of the procedures in this section, follow the safety instructions in your Owner's Manual or Product Information Guide. |
- Shut down the computer through the Start menu.
- Ensure that your computer and attached devices are turned off. If your computer and
attached devices did not automatically turn off when you shut down your computer,
turn them off now.
 |
NOTICE: To disconnect a network cable, first unplug the cable from your computer and then
unplug it from the network wall jack.
|
- Disconnect any telephone or telecommunication lines from the computer.
- Disconnect your computer and all attached devices from their electrical outlets, and
then press the power button to ground the system board.
|
|
CAUTION: To guard against electrical shock, always unplug your computer from the electrical outlet before opening the cover. |
- Remove the computer cover.
- Release and remove the front panel.
- Remove the front-panel insert.
- Connect the floppy-drive power cable to the back of the drive.
|
|
CAUTION: Match the colored strip on the cable with pin 1 on the drive (pin 1 is marked as "1"). |
- Connect the data cable to the back of the drive and to the floppy drive connector on
the system board.
- Position the top of the floppy drive bracket so that it is completely flush with the
bottom of the lower drive bay, and then slide the floppy drive bracket forward into
place.
 |
NOTE: The top of the floppy drive bracket has two slots that fit into two clips on the bottom of the upper drive bay. When the floppy drive bracket is properly mounted, it remains in place without support.
|
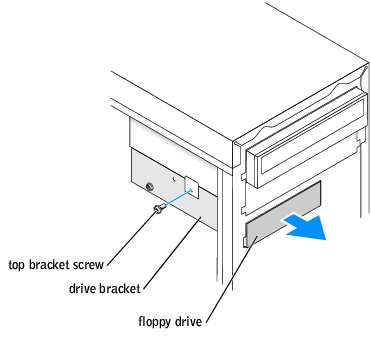
- Secure the floppy drive bracket with the top bracket screw that came with your drive.
- Reattach the front panel.
- Check all cable connections, and fold cables out of the way to provide airflow for the
fan and cooling vents.
- Replace the computer cover.
|
NOTICE: To connect a network cable, first plug the cable into the network wall jack and then
plug it into the computer.
|
- Connect your computer and devices to electrical outlets, and turn them on.
After you turn on your computer, press <F2> when you are prompted to enter setup mode.
Highlight Drive Configuration and press <Enter>.
Use the left and right arrows to change Diskette Drive A from Not Installed to 3.5 inch, 1.44 MB.
Press <Enter>.
Highlight Integrated Devices (LegacySelect Options) and press <Enter>.
Make sure that the Diskette Interface entry is set to Auto. If necessary, use the left and right arrows to set it to Auto.
Press <Enter>.
Press <Esc>.
Press <Enter> to save changes and exit.
The computer restarts.
See the documentation that came with the drive for instructions on installing any software required for drive operation.
Adding or Replacing a CD or DVD Drive
|
|
CAUTION: Before you begin any of the procedures in this section, follow the safety instructions in your Owner's Manual or Product Information Guide. |
- Shut down the computer through the Start menu.
|
NOTE: Drives sold by Dell come with their own operating software and documentation. After
you install a drive, see the documentation that came with the drive for instructions on installing
and using the drive software.
|
- Ensure that your computer and attached devices are turned off. If your computer and
attached devices did not automatically turn off when you shut down your computer,
turn them off now.
|
NOTICE: To disconnect a network cable, first unplug the cable from your computer and then
unplug it from the network wall jack.
|
- Disconnect any telephone or telecommunication lines from the computer.
- Disconnect your computer and all attached devices from their electrical outlets, and
then press the power button to ground the system board.
|
|
CAUTION: To guard against electrical shock, always unplug your computer from the electrical outlet before opening the cover. |
- Remove the computer cover.
- Release and remove the front panel.
- Remove the front-panel insert.
- Ensure that the jumper setting on the new drive is set for "cable select" (see the
documentation that came with the drive for information).
|
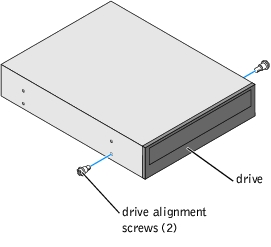
NOTE: Some computers come with only two alignment screws; others come with four. You
only need two alignment screws for this procedure.
|
- Remove the two alignment screws, shown in the following figure, from the front
of the computer and insert them into the drive.
- Gently slide the drive into place.
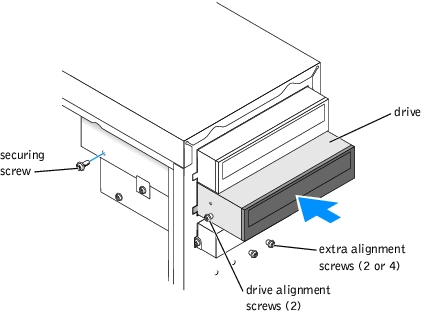
- Once the drive is in place, apply pressure to ensure that the drive is fully seated.
- Use the securing screw that came with the drive to attach the drive to the computer.
|
|
CAUTION: Match the colored strip on the cable with pin 1 on the drive (pin 1 is marked as "1"). |
- Connect the power cable to the system board.
- Locate the data cable from the CD or DVD drive in the upper drive bay and connect
its middle data connector to the new drive.
- Check all cable connections, and then fold the cables out of the way to provide airflow
for the fan and cooling vents.
- Reattach the front panel.
- Replace the computer cover.
|
NOTICE: To connect a network cable, first plug the cable into the network wall jack and then
plug it into the computer.
|
- Connect your computer and devices to electrical outlets, and then turn them on.
See the documentation that came with the drive for instructions on installing any software required for drive operation.
Replacing a Hard Drive
|
|
CAUTION: Before you begin any of the procedures in this section, follow the safety instructions in your Owner's Manual or Product Information Guide. |
|
|
CAUTION: To avoid damage to the drive, do not set it on a hard surface. Instead, set the drive on a soft surface, such as a foam pad, that will sufficiently cushion it. |
- Shut down the computer through the Start menu.
- Ensure that your computer and attached devices are turned off. If your computer and
attached devices did not automatically turn off when you shut down your computer,
turn them off now.
|
NOTICE: To disconnect a network cable, first unplug the cable from your computer and then
unplug it from the network wall jack.
|
- Disconnect any telephone or telecommunication lines from the computer.
- Disconnect your computer and all attached devices from their electrical outlets, and
then press the power button to ground the system board.
|
|
CAUTION: To guard against electrical shock, always unplug your computer from the electrical outlet before opening the cover. |
- Remove the computer cover.
|
NOTICE: Before touching anything inside your computer, ground yourself by touching an
unpainted metal surface, such as the metal at the back of the computer. While you work,
periodically touch an unpainted metal surface to dissipate any static electricity that could harm
internal components.
|
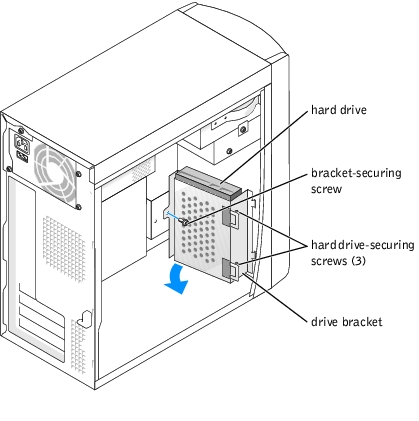
- Remove the hard drive:
- Disconnect the power and hard-drive cables from the drive.
- Remove the bracket-securing screw, and then remove the drive bracket from the
computer.
- Remove the three hard drive-securing screws, and then remove the hard drive
from the bracket.
|
NOTICE: Ground yourself by touching an unpainted metal surface on the back of the computer.
|
|
NOTICE: When you unpack the drive, do not set it on a hard surface, which may damage the
drive. Instead, set the drive on a soft surface, such as a foam pad, that will sufficiently cushion
it.
|
- Unpack the replacement hard drive.
- Check the jumper setting on the back of the replacement drive.
Ensure that the jumper setting on the new device is set for "cable select" (see the documentation that came with the drive for information).
- Install the hard drive:
- Place the hard drive in the bracket so that all three screw-hole tabs insert into the
three screw holes on the hard drive.
- Secure the drive to the bracket with the hard drive-securing screws that you
removed in step 6.
- Install the bracket into the computer with the bracket-securing screw that you
removed in step 6.

|
|
CAUTION: Match the colored strip on the cable with pin 1 on the drive (pin 1 is marked as "1"). |
- Connect the power and data cables to the back of the replacement drive.
- Replace the computer cover.
|
NOTICE: To connect a network cable, first plug the cable into the network wall jack and then
plug it into the computer.
|
- Connect your computer and devices to electrical outlets, and turn them on.
- See the documentation that came with the drive for instructions on installing any
software required for drive operation.
Back to Contents Page